How To Play Software Instruments In Garageband

Here’s a quick how-to for those beginning to use Garageband. Garageband has a nice library of software instruments available, allowing you to make your own tunes as opposed to solely using loops. Here’s how you do it.
When you create a new Garageband project, you will start with the piano software instrument (unless you initially selected to start with another instrument). If you want to play the piano, simply go Window > Musical typing or press Apple-K. Now a virtual keyboard will appear.
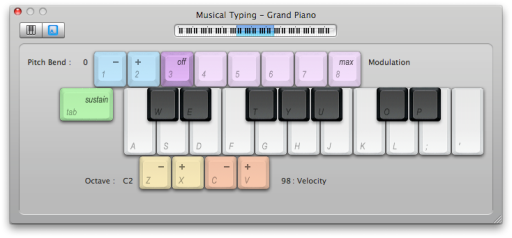
One the top left corner of the window, click the button with the A. Now sounds will play according to each key you hit. To select different software instruments, click the I logo on the bottom right of Garageband. If you want multiple software instruments, select the + icon on the bottom left of Garageband and select software instrument.
– Alexander Garovi
![]()
![]()
![]()
![]()
![]()
![]()
![]()
![]()
![]()
Tip 18: Multiple Home Pages With Google Chrome
![]() New Google Chrome OS X users – here’s a quick tip on how to set multiple homepages with Chrome. When you open Google Chrome, the homepage will be the first website to open on the browser at startup. Here’s how you do it.
New Google Chrome OS X users – here’s a quick tip on how to set multiple homepages with Chrome. When you open Google Chrome, the homepage will be the first website to open on the browser at startup. Here’s how you do it.
1. Open Google Chrome
2. Go Chrome > Preferences (Or Command-,)
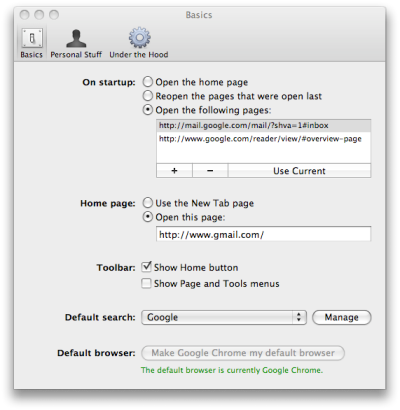
3. On the Basics tab in Preferences, select the option Open The following pages
4. There are two ways you can select your homepage. You can either previously load the websites you want and then click Use Current. You can also type in the URL or URLs you want for your homepage.
And that’s it. Your new homepages will be set.
– Alexander Garovi
![]()
![]()
![]()
![]()
![]()
![]()
![]()
![]()
![]()
Google Chrome OS X Beta Now Available

It’s finally here – the Google Chrome Beta is now available on OS X. Although the browser has been available for Windows for some time now, Chrome has not been compatible with OS X. Google Chrome can now be found in the Free Apps page and on the Chrome website. Google Chrome how-tos are on the way!
– Alexander Garovi
![]()
![]()
![]()
![]()
![]()
![]()
![]()
![]()
![]()
Tip 17: Changing The Dock Theme
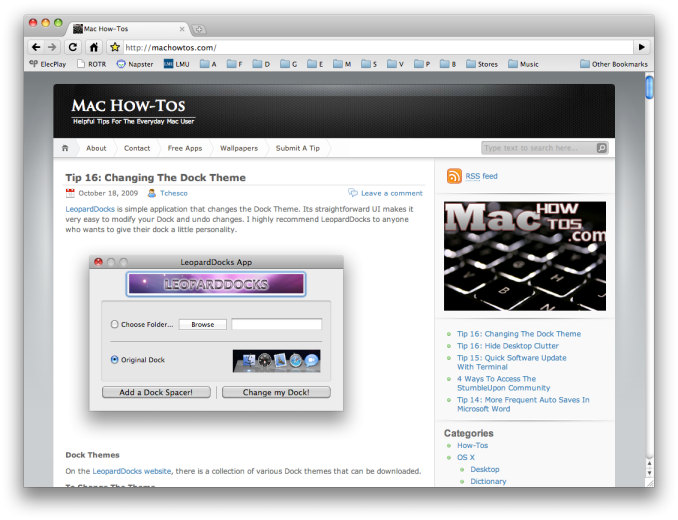
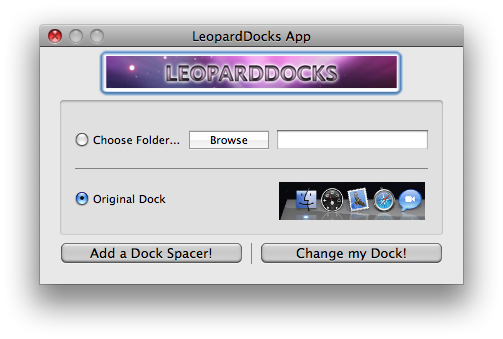
LeopardDocks is simple application that changes the Dock Theme. Its straightforward UI makes it very easy to modify your Dock and undo changes. I highly recommend LeopardDocks to anyone who wants to give their dock a little personality.
Dock Themes
On the LeopardDocks website, there is a collection of various Dock themes that can be downloaded.
To Change The Theme
1. Download and Launch LeopardDocks. Download a theme from leoparddocks.com
2. In LeopardDocks, browse for the downloaded theme
3. Select the theme, click “Change My Dock” and confirm the changes with your password.
The Dock theme will now change
– Alexander Garovi
![]()
![]()
![]()
![]()
![]()
![]()
![]()
![]()
![]()
Tip 16: Hide Desktop Clutter
 Want to give your Desktop a new clean look? With Terminal, you can forget about organizing all of your Desktop files and simply hide them. Enter this command in Terminal:
chflags hidden ~/Desktop/*
To Undo:
chflags nohidden ~/Desktop/*
This command is very useful, if you don’t want to deal with constantly having Desktop clutter.
– Alexander Garovi
![]()
![]()
![]()
![]()
![]()
![]()
![]()
![]()
![]()
Tip 15: Quick Software Update With Terminal
Here’s a quick Terminal command that lets you install Apple’s available software updates. There are two sudo commands: one for installing all of Apple’s updates and one for only installing recommended software updates.
All Updates
sudo softwareupdate -i -a
Recommended Updates
sudo softwareupdate -i -r
More quick Terminal tips are on the way.
– Alexander Garovi
![]()
![]()
![]()
![]()
![]()
![]()
![]()
![]()
![]()
4 Ways To Access The StumbleUpon Community
 Want to change internet browsers, but can’t imagine not having a Stumbleupon plugin? Stumbleupon, the popular Internet community that allows users to discover and rate websites, has various ways of being accessed. Users can connect to Stumbleupon through the service’s website along with Internet browser tools. Here are some tools that work with Stumbleupon.
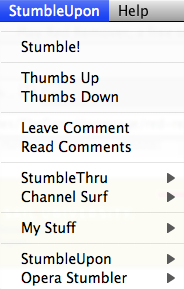
1. Opera Stumbler is a third party plugin that allows Opera users to access StumbleUpon. Opera Stumbler is located in Opera’s menu bar and offers all of the features Stumbleupon provides. This tool is free, and easy to install.
2. StumbleUpon for Firefox is a toolbar-based plugin for Firefox that lets you access the Stumbleupon community. This plugin allows you to stumble, send messages, rate pages and more. StumbleUpon for Firefox is free to download.
![]()
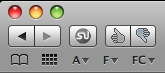
3. Stumbi for Safari is a lightweight plugin that is situated next to the back-forward buttons and Safari’s menu bar. This plugin gives you the ability to vote, send messages to friends and more. Stumbi costs $4, but you can download a free trial with 100 stumbles.

4. You can also access the Stumbleupon community on the service’s website. Stumbleupon offers a virtual toolbar that allows you to access all of the features that would be in a toolbar app. This method is great if you don’t want to deal with installing browser plugins.
![]()
– Alexander Garovi
![]()
![]()
![]()
![]()
![]()
![]()
![]()
![]()
![]()
Tip 14: More Frequent Auto Saves In Microsoft Word
![]() Here’s another Microsoft Word Tip. Saving your work is always important, in order to prevent frustrating data loss. Luckily, if you sometimes forget to save, Word auto saves your progress at a default setting of every 10 minutes. You can even shorten this amount of time and make auto saves more frequent. Here’s how you do it:
Here’s another Microsoft Word Tip. Saving your work is always important, in order to prevent frustrating data loss. Luckily, if you sometimes forget to save, Word auto saves your progress at a default setting of every 10 minutes. You can even shorten this amount of time and make auto saves more frequent. Here’s how you do it:
1. Open Microsoft Word
2. With a document open, go File > System Preferences (Command-,)
3. In the Output and Sharing section, select Save
4. You will see a checkbox next to “Save AutoRecover info every (set amount of time) minutes”
![]()
5. Enter the amount of time between auto saves
Note: I believe you have to save one time manually, before the auto save function works.
This tip concludes today’s Microsoft Word tips.
– Alexander Garovi
![]()
![]()
![]()
![]()
![]()
![]()
![]()
![]()
![]()
Tip 13: Changing The Default Font In Microsoft Word
![]() If you want to give your docs a new look, changing the default font is very easy to do. Here’s how you do it:
If you want to give your docs a new look, changing the default font is very easy to do. Here’s how you do it:
1. Open Microsoft Word
2. Open a document, or create a New Blank Document
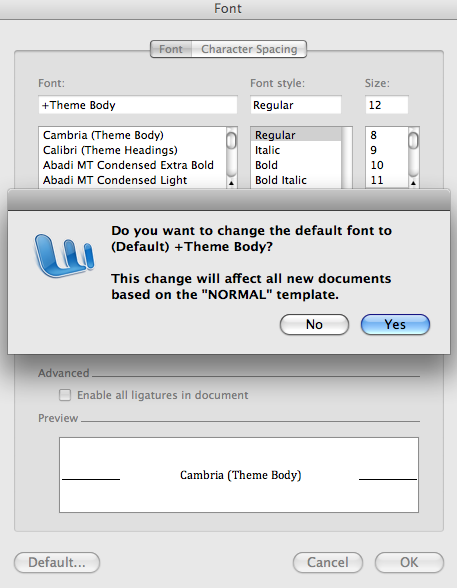
3. Go Format > Font (Command-D)
4. Select the font, size, font styles etc.
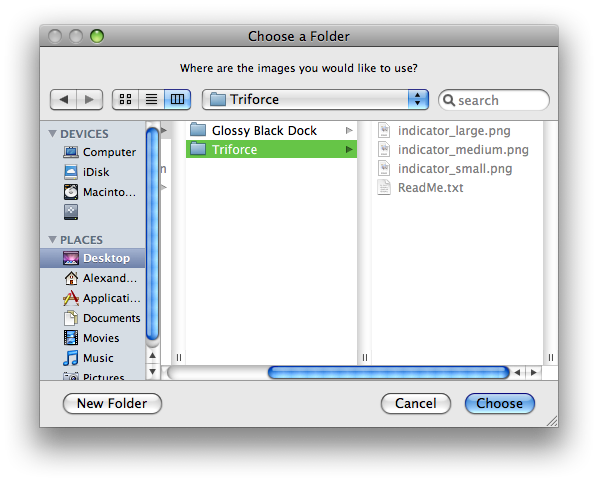
5. On the bottom-left hand corner of the window, click Default
6. A box asking if you want to change the default font will appear. Click Yes
Your default font will now be the selected one. More quick Microsoft Word tips are on the way.
– Alexander Garovi
![]()
![]()
![]()
![]()
![]()
![]()
![]()
![]()
![]()
Tip 12: Renaming Bootcamp Partitions
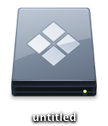
Tired of seeing the name, “untitled” under your Bootcamp partition? With a few easy steps, you can change it to something more interesting. Before changing the partition’s name, you must reboot into Windows. Unable to take screenshots in Windows, I was forced to use my camera :-/. Here’s how you do it:
1. Reboot into Windows
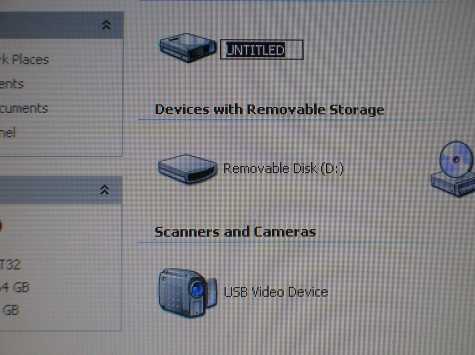
2. Go Start > My Computer
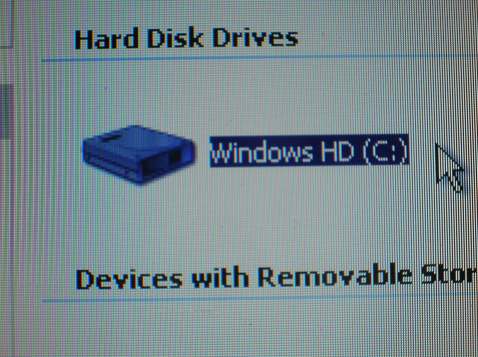
3. You will see the C: named “UNTITLED”.
4. Highlight the HD’s name, enter a new name and press Enter
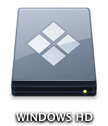
5. Reboot in OS X and you should see your partition with its new name. The only issue with this tweak is that the new name will be in caps.
Before:
After:
I personally don’t use a name at all – At startup in OS X, highlight the partition’s name and press Spacebar and Enter. This must be done in OS X, because Windows doesn’t permit empty Disk names. At the computer’s next startup, the name will be changed back to “Untitled”.
– Alexander Garovi
![]()
![]()
![]()
![]()
![]()
![]()
![]()
![]()
![]()


